Tips For Setting Up Your Stained Glass Hobby Work Area
One of the most persuading aspects of getting into the hobby of working with stained glass is that the cost of entry is quite low. The cost of the basic equipment and tools that you need to get started is much less than many other hobbies.
With a few tools and some supplies you can easily start to learn how easy it is for you to make beautiful stained glass windows, lamps and other items. Here are some hints and tips on how you can also set up a great working area for your projects without spending a lot of money.
For starters, find a sturdy clutter-free surface from which to work. Many people prefer to work with stained glass supplies while sitting rather than standing. Make sure your work table is stable and strong enough. Don’t use a wobbly folding table.
For best results, get a piece of fiberboard or other cork like material to give yourself a firm but somewhat cushioned work surface. This makes it easier to work with the glass and will allow you to use push tacks and pins when you are working with your patterns.
Set yourself up with access to water so you have it ready at hand when you are working. You’ll need water for washing and cleaning the glass, and your powered grinder or ring saw needs water to operate. If you don’t have a tap close by, make sure you keep a few gallons of water on hand to wash away any chemicals you may use and glass dust.
When you cut and break stained glass you will create a lot of small chips and tiny pieces of glass that can build up on your work area and lodge in corners and cracks. Make sure you have a pair of safety glasses or goggles and wear them whenever you are cutting or breaking glass. Get yourself a bench brush and dust pan to use to dry sweep these small pieces away and to keep your work area clean. Little bits of glass that get stuck in your hands or fingers can be very painful.
Make sure the area where you work is well ventilated. When you are using flux and solder you should make every effort not to breath the fumes. The lead used in solder and in the lead came for stained glass window kits is a toxic material. Make sure that the lead and lead particles don’t come in contact with food or into any areas where you prepare it.
Set up your work area with good lighting and access to electric power for your soldering iron and other equipment. Keep some rags and other cleaning supplies on hand so that you can clean up and keep things neat. Set aside a cabinet or drawer stack to store your tools and equipment when not in use. If you are using stained glass kits and start with larger pieces of glass, find a safe place to store the glass. Make sure it is securely kept away from small children and pets.
With just a little bit of thinking ahead, you can quickly and safely set things up to get started with your stained glass hobby. Planning ahead to make a spot to do your work will make it easier for you to learn and you’ll see results faster. Get your work area set up right and you’ll be ready to go.
Choosing a Soldering Iron for Your Stained Glass Kit
Once you begin your stained glass hobby you will find that the soldering iron in your stained glass kit will become one of the tools you use most.
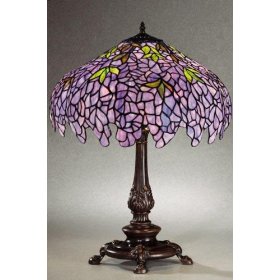
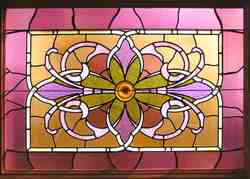
There are two different types or methods of making items from stained glass. The traditional lead came method is used to make leaded glass windows or other, usually larger items. The copper foil method is used to make beautiful Tiffany style stained glass lamps or other more delicate artwork. Although the materials you use to join your stained glass pieces is not the same in each of these methods, you will still need to use your soldering iron to attach, or solder, these pieces together.
Because soldering stained glass is a delicate operation rather than one that requires a heavy hand, it is not necessary to have a large expensive soldering iron. In fact a lightweight and easy to handle iron is best to allow you to easily solder the finer joints you will have between small pieces of glass.
When you look to purchase a soldering iron you will find that they are rated by their wattage. This wattage determines the amount of heat they will produce. And unless you have prior experience and intend to do large stained glass projects such as church windows as small soldering iron in the 80 to 100 watt range will handle all your needs.
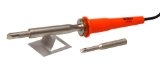
One typical example of a soldering iron of type would be the Weller W100PG Professional Stained Glass Iron. Irons of this class usually are sold with a number of extra tips. These tips come in a variety of widths. This allows you to easily control the final width of your soldering joints and build up the solder so the final look is even and clean. It is a simple matter to change tips and by doing so change the width of your solder line. The different tips also vary by the amount of heat that is put out. So you can control the ouput heat based on the tip you choose.
When you are choosing between the various soldering irons for your stained glass kit try to stay with one that has iron plated tips. These tips will last a long time and are easy to clean and maintain. By taking care of your tips and making sure you strike them off and clean them before you switch to a different one you will find that they will improve in performance over time. By using them and keeping them clean they become smoother and the solder flows off them smoothly and easily.
If you are starting your hobby and looking to get your first stained glass kit, or are putting a kit together piece by piece, there is no need to spend a lot of money on your first iron. While it probably doesn’t pay to go with the cheapest one you can find, it is also not necessary to spend a lot of money on your first iron.
Look at the various choices available. Pick a mid-range iron and use that as you start your hobby. As you get a feel for stained glass work and learn more about what types of project you enjoy doing you will also become more familiar with doing soldering and using your iron. Then if your craft takes you in a specific direction you can consider getting another iron that is more targeted to the work you will be doing.
Soldering irons are included in many starter stained glass kits or you can decide to buy one individually. Choosing one is a fairly easy job as you start your hobby.
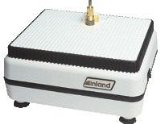
Do You Need a Stained Glass Grinder When Starting Your Hobby?
One of the first questions that will come to mind when you begin to consider getting into a stained glass hobby is whether or not you should spend the money on a stained glass grinder right at the start.
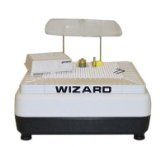
The cost for a low end grinder starts around $100 and better quality ones with more options will be in the $200 or more range. So for many this is a fairly big decision to make. The truth of the matter is that whether you get a grinder or not will probably determine if you actually end up making some excellent projects and decide to continue working with glass or not.
Many people see a magnificent stained glass lamp, or marvel at the elegance of a tasteful stained glass window as an accent in a home, and think that if they learned about making stained glass themselves that they would be able to create something at least nearly as nice for their own home.
When you check into this idea you find that the process of making stained glass lamps or windows really isn’t a complicated matter. Only a very few basic tools are required. And for many years in the past there was no such thing as a powered stained glass grinder.
So a new hobbyist may think, “The artisans who made all the great stained glass windows in the cathedrals in Europe or the original Tiffany lamp craftsmen didn’t have an electric powered grinder, why would I need one?” And they go online and get one of the stained glass kits that include the very basic tools but do not include a grinder. Then they start their first project and either find that they can barely get it put together if they are using lead came, or that they are done before they start if they were trying their first project using foil.
While there were no electric grinders in the past, the new stained glass crafter will quickly find that after cutting the glass, the edges are sharp. And that when glass breaks it doesn’t break in a perfectly straight line up and down on the edge. Think about breaking a piece of peanut brittle. The broken edge is sharp at either the top or the bottom and is always slanted.
And he will also find that the glass often doesn’t break exactly along the score line he made so it will be a little bit out of shape. He will try rescoring it and nibbling away with the pliers thereby just creating more sharp and variously slanted edges on the glass.
If he is making a lead came project, the channel in the came will allow some irregularities to be covered up, but if his idea was to start with a foil project he is done before he starts. So he has two choices, either learn to grind and smooth the edges by hand using hand held grinding stones and emery sanding paper or go online and order an electric grinder.
You need a stained glass grinder to smooth the edges of the glass after it is cut and to roughen the edge if you are doing foil to allow it to adhere well. And the main and sweetest advantage is that it allows you to shape your piece to the exact size to fit your pattern after the glass is cut. Doing this by hand is tedious and extremely time consuming.
It can be said that the availability of the reasonably priced electric home use stained glass grinder is the main thing that has allowed making your own stained glass lamps and windows explode as a hobby. What used to take hours can be done in minutes. You don’t need to be a full time craftsman now days to make an exquisite stained glass lamp or window. If you debating whether or not to take the plunge into this hobby get one of the stained glass kits that include a grinder. You’ll be glad you did.
Here is a link to a minute and a half long YouTube video showing a stained glass grinder in use:
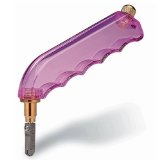
How To Cut Stained Glass With a Pistol Grip Glass Cutter
The idea of cutting glass might sound like it is difficult to do. But all you need is a stained glass cutter and a little practice and you'll be surprised how easy it really is. There are many stained glass cutters of different types and shapes and all work well.
However, there is one type that many people who work with stained glass prefer and it is called a pistol grip glass cutter.
A pistol grip glass cutter seems to give the most control when you are cutting the curves and patterns needed for most stained glass projects. But no matter what type you use, here are a few tips to get you started cutting glass quickly and easily.
You can cut glass either way: Either by pulling the cutter toward you or by pushing it away. The cutter doesn’t care, and you should start by using the method that comes easiest to you. As you become more skillful you’ll be able to either pull or push the cutter depending on which will make it easier to do the cut.
Do your first cuts from a standing position: When you are learning, it will probably be easier for you get the feel of glass cutting when doing it while standing. Once you become more practiced you’ll find that you can sit or stand as you prefer.
Hold the glass cutter with the wheel straight up and down: It’s important to remember and follow this rule. You need to keep the cutting wheel straight while following your line and maintain even pressure at all times.
Find a way to hold the cutter comfortably: There is no hard or fast rule about how you should hold a stained glass cutter. And that is why many prefer a pistol grip glass cutter since it is made to fit in your hand comfortably.
Learn the sound that glass makes by doing straight practice cuts on window glass: This is a good way to practice. As you make your cut you’ll hear the cutter make a ‘sizzling’ or crisp ‘crunching/crackling’ sound that indicates it is making the score. You don’t have to press real hard, just firmly. And of course the glass cutter doesn’t ‘cut’ all the way through the glass, it just makes a ‘score line’ on the glass that allows it to break along this line cleanly after you finish using the stained glass cutter.
Run off the edge if possible when you finish your cut: This is the side where you will break the glass from since you know the score line has gone all the way to the edge.
Safety first: Always use eye protection when you are cutting glass and wear gloves and other necessary safety equipment as needed. You don’t want to find out what a little super sharp piece of glass in your eye feels like or experience the damage it can do.
If you start out on your hobby by getting one of the many stained glass kits that comes with a cutter you may want to consider a kit that includes a pistol grip glass cutter. Or if you buy your stained glass tools separately you can then decide to try a cutter of this type.
And no matter which type of cutter you use you will find that cutting stained glass is an easy skill to learn. Do a little experimenting on inexpensive clear window glass first to get the feel of things, and you’ll be making Tiffany style stained glass lamps in no time.